What is DoubleClick Search?
As you might’ve guessed, it’s DoubleClick…but for search. DoubleClick Search (DS) is at its core an incredibly powerful bid management tool, with some hardcore tech that can be leveraged to get the most out of your search campaigns. Beyond that, DS expands into a robust and versatile search campaign management tool, streamlining some of the otherwise time-consuming or awkward tasks associated with running a paid search campaign. In this article, we’ll cover a few of the neat integrations with paid search, and some useful tips when it comes to running your search campaigns through DoubleClick.
As with similar bid management tools, DS uses URL wrapping to forward a user’s click first to the DoubleClick servers, and then through to the landing page. This, in combination with DS’s tracking pixels (floodlight tags), creates a unified system that lets you bring transactions and revenue into your search campaigns and enables visibility of campaign performance by revenue, CPA, and ROAS/ROI. This brings us to our first section of DS – bid strategy. With bid strategies, we can use these conversion metrics to dictate an automated strategy across targeted campaigns in the account.
The bid strategy section has a lot of predefined strategies that you can set up in around 5 minutes. Useful strategies include:
- Target Position
- Click Volume
- Revenue
- Conversions
Simply select your target e.g. Target Position of 3.0, set your constraints: Minimum bid $0.50, maximum bid $10.00, then apply the bid strategy to the campaigns of your choice. DS then uses live AdWords data to attempt to reach your goal within your constraints. For a more advanced approach we can pull in the previously discussed revenue and CPA calculations to target specific CPA or ROAS goals.
If DS cannot optimise toward your goal (if your max bid is too low, for example) it will tell you the % of spend that I couldn’t optimise and the reason it couldn’t. This helps to understand how close you are to meeting your target goals, and what kind of adjustments you can make to your overall strategy to reach them.
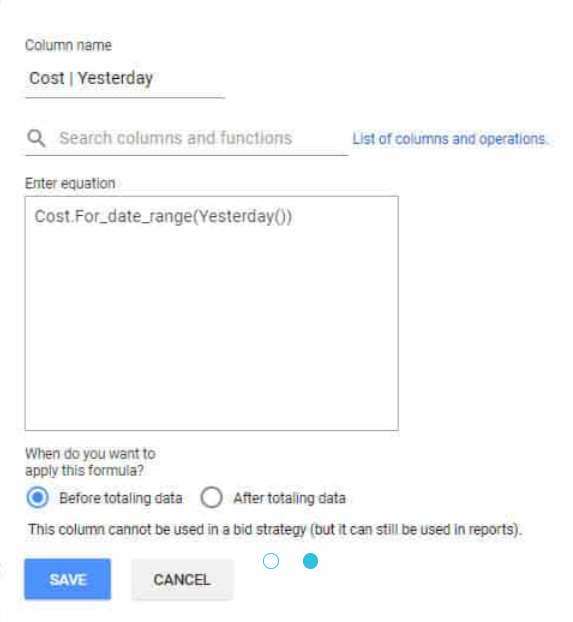
DS also has a potent formula column feature, where we can create custom metrics to be utilised in bid strategies or reporting. There is a library of functions and columns that you can use in formula columns available on the DS Support site. One example use of formula columns is to create custom CPA and ROI columns for sets of conversions. If an advertiser provided holiday packages, for example, you might have a floodlight tag for your Fiji packages and one for your Vanuatu packages. You could then call these columns into a total “South Pacific” CPA column to see how the region performs as a whole.
A more complex example would be to pull in your cost for a date range to use as a comparison (Image 2).

DS & Budget pacing
This kind of formula column can be used in tandem with the budget pacing functionality of DS which we will cover next.
DS’s budget pacing section allows you to create a budget for a particular time period and apply that budget to a set of campaigns to help you monitor spend and ensure that your pacing is on track. This can be especially useful for tactical campaigns that might run for periods across or within months.
Simply set your date range, the budget amount and which campaigns fall under this budget, and DS will then calculate the percentage of budget spent, percentage of time passed, the ratio of the two, days remaining etc. You can then bring in your custom columns like “cost for yesterday”. This will give you an indication of how close you are to your target daily spend according to your budget remaining and the kind of bid and budget adjustments you need to make.

Complex calculations
But what if you wanted to pull all of this data into a live dashboard with colour-coded progress graphs, and more complex calculations? Well with DS and a bit of Excel wizardry that’s exactly what you can do. DS can turn any view from the interface into a web query. DS will then store the view in a URL and allow you to fetch the data from Excel. The setup is very straightforward:
- Download your view as a web query
- Copy the URL generated
- Load up Excel and add a new data connection
- Paste the URL
- Select the appropriate table
- Load it into a sheet
Now you have a live connection to DS, and, therefore all your linked search accounts, from which you can build out custom dashboards and pacing sheets to keep track of your accounts in an unrestricted Excel environment.

Note the use of my cost and conversions for the previous 3 days, and the percentage difference between yesterday’s spend and the target daily spend for the rest of the month. This at a glance gives you an understanding of how your accounts are pacing and where you need to make changes to ensure you don’t run out of budget for your campaigns.
Hopefully you’ve found something that can help streamline your workflow or kick your search campaigns up a notch. This is the end of the easy-mode section – below I’ll go through one of the more complex set ups in DS that allows the tracking of Google Display Network (GDN) Banner ads in DoubleClick Search. Prepare yourself!
Tracking GDN activity in DoubleClick Search: The dummy keyword method
DS does not natively support GDN activity so, to track performance of GDN campaigns, we need to trick DS into thinking that the display ads in our GDN campaigns are keywords in a search campaign.
This is a pretty straightforward process once you get the hang of it but there are a few different steps to get it to work. Essentially, we want to upload an identical set of search campaigns, and take the tracking information applied to them and insert it into our GDN campaigns; these search campaigns contain our “dummy keywords”.
Here’s the step by step guide:
- Build your GDN campaigns as normal
- Export the GDN campaigns to excel from AdWords Editor

- We must change the Ad Name column and Campaign & Ad Group names.
- Find & replace your Campaign & Ad Group names: for example, if you use |GDN| to identify campaign type, call them |Placeholder| or something that will let you identify your “dummy keyword” campaigns.
- Change the name of the column ‘Ad Name’ to ‘Keyword.’

- Copy the whole sheet, then in editor ‘account>import>paste text’ into your account
- Ensure that you get the same number of ads, campaigns and ad groups as your GDN campaigns
- Ensure that you have keyword-level URLs across all keywords
- Pause the placeholder campaigns
- On the keyword level and the campaign level, set ‘bid strategy’ to ‘manual CPC.’
- Ensure the campaign type is ‘search only’; none of the other settings (e.g. budget, CPC, etc.) will matter as these keywords will always be paused but set as required for upload.
- Delete all image ads from the new ‘placeholder’ campaigns
- Post your placeholder campaigns to AdWords, and sync your engine account in DS
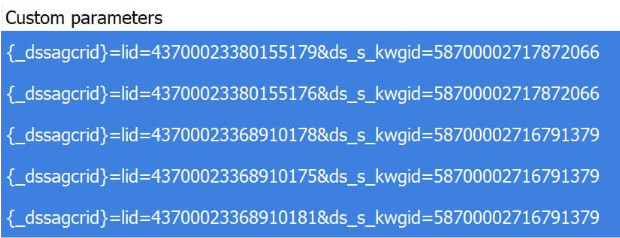
- Re-download your account in the editor, and you should notice that you now have custom tracking parameters on all your keywords
- Now, we need to put these custom parameters on our Ads from the GDN campaign

- Now, we are essentially going to reverse the process from before and re-import the keywords as ads into the editor
- We need to change the ‘Keyword’ column to ‘Ad Name.’
- Find/replace your Campaign & Ad Group names back to what the original GDN campaigns were called
- Also, remove the ‘Criterion Type’ column, as this will break the import
- Before we import back into the editor, remove all existing ads from the existing GDN campaigns in the editor
- Copy the whole sheet, then in editor ‘account>import>paste text’ into your account.

- Sort your ads by name, select each ad name click “choose image” and add your images back to their respective ads
- For example, I select all of the ads named pic_of_cute_dog.zip across all campaigns
- I navigate to where my image “pic_of_cute_dog.zip” is stored and add this image to all of these ads in the editor
- Then do the same for pic_of_even_cuter_dog.zip and so on until you’ve associated all of your ads with an image
- SANITY CHECK: check across your GDN campaign and ensure that all your ads have custom parameters, and no errors and that your placeholder campaigns are still paused.
- Treat your GDN campaigns as you would any other GDN campaign and push them live
- Sync DS again, and you should see your GDN campaigns in the normal view along with your search campaigns
- Note: you cannot see GDN targeting or ads in DS so performance is recorded at the ad group level only.
- It’s important to note that if you want to add new ads, ad groups, campaigns etc., to your GDN activity, you will have to go through the process again for any additional content.
19 Steps later and that’s it! You can now handle your Google Display Network management and search network management from the one platform, and use all your custom columns, revenue from floodlights, pacing docs and everything else DoubleClick Search has to offer across them.
If you survived the nightmare of the living dummies congratulations, consider yourself a pro!
Written by
Luke Ashmore-Delaney


